Total Pageviews

Sunday, June 15, 2014

DIY: Ribbon Bead Earrings

Love the look of ribbon jewelry?  Then you will love this tutorial.  It's easy and simple.  There are no major skills required at all.  All you need is a bit of imagination to create these lovely earrings.


Skill Level:
Beginner

Skills Needed:
Opening Jump Rings

Materials:
Two 8mm Split Rings
Ear Wires
2 Large Holed Beads
Ribbon
Fray No More or product similar

Tools:
Scissors
Ruler
Flat/Chain Nose Pliers
Collapsible Eye Needle


Measure and cut two pieces of ribbon around 8 inches long.  Open the loop at the bottom of the ear wires and slide on a split ring. Close the loop.  The reason I used split rings instead of regular jump rings is the split rings are more stable and can hold up under rough handling.  Go ahead and repeat for the other ear wire.

Slide the ribbon into the split ring.  Slip on the collapsible eye needle onto both ends of the ribbon.  Slide the needle into the opening of the bead and out the other side.  Pull completely through and slide the needle off.  

Slide the bead up the ribbon and tie an overhand knot just up from the end of the ribbon.  Coat the ends of the ribbon with the Fray No More.


Repeat for the other earrings.  Wear them in style.


Saturday, June 14, 2014

DIY: Collapsible Eye Needle

Here is an easy DIY tutorial for a collapsible eye needle.  It seems I always need them. I never have them, so I decided to make my own on the fly.  They work pretty well.

Skill: BEGINNER

Materials & Tools:
Round Nose Pliers
Flush Cutters/End Nippers
26 gauge or smaller craft wire


Cut about 10 inches of craft wire.  Place your round nose pliers at the center point of the wire about midways down the beak of the pliers. 

Cross the wire ends over each other.  Begin twisting the wire (not wrapping) until you reach the desired length.  Trim ends.  Slide the needle off the pliers.  Straighten and use until you wear it out.


Saturday, June 7, 2014

Lighting the Way: A New Tutorial!

Not a jewelry tutorial this time.  It's a distressed lamp tutorial.  Decided to do something different since I am working on a new studio space.  I created this lamp today and wanted to share.  My studio colors are Ocean Whisper, Chef White and Crimson Glow. These are Valspar colors that are available at Lowe's.  I recommend getting the Reserve in Satin Finish.  It covers far better than the Valspar Ultra and Valspar Signature lines.


SUPPLIES:
Valspar Color Samples in your choice of colors
Valspar Clear Glaze
This Lamp from Target - $24.99
Painter's Tape
Brushes - One about 1/2" Flat Artist Brush and one smaller regular painter's brush
Paper Towels
Foam Plate
Crown Spray Tuff-Strip Multi-Surface Remover
Small Paint Scraper
Sand paper (I used my Dremel)
Krylon Low Odor Clear Finish

SKILL LEVEL: 
Beginner

CRAFT TIME:
A couple of hours so paint can dry.

NOTE ABOUT THE LAMP - The lamp may look wooden, but it is painted resin.  DO NOT SAND OR STRIP.

What it looks like online at Target.com


Unscrew the ball from the top of the harp on the lamp. Remove shade and harp from the lamp.  Put painter's tape just under the trim on the shade on the top and bottom.

Using the small artist brush apply paint to the top rim and the bottom rim.  If you put the tape under the trim, it will help to keep the paint off the main part of the shade. Set aside to dry.


Cover the upper metal part of the lamp with tape as well as the the upper part of the cord that goes into the lamp base.

Slather the paint onto the lamp body with the larger brush. Put it on rather thick.  Don't worry about it looking messy or clumpy.   I used Chef White as my base color.

I covered as much of the lamp as I could leaving all kinds of streaks and heavy lines in it. 

Let dry COMPLETELY.


Once the shade is dry, tape over the rims. You don't want any of the glaze on the rim you just painted.  If you do happen to get it on the rims, wait until completely dry and touch up the rims very carefully so you don't get any on the main part of the shade.

The reason why I started with the rims was because I was unsure if I wanted to paint the main part of the shade or not.  I'm glad I decided to paint the shade.  It just looked odd to me.

Pour about 3/4 cup Clear Glaze onto a foam plate.  Dip the brush back into the Chef White a couple of times and then mix with the glaze on the plate.  Working in large swift strokes brush the shade with the glaze.  Remember, you aren't painting.  You are glazing.  Only put enough glaze mixture on the shade to your liking.  It shouldn't be completely covered up.  If you feel that you got too much on, just wipe it off with a paper towel. Set aside to dry.

Tape off a few sections on the lamp body that you want to add color to.  Slather on the color!  Let dry.  I chose to paint the top ring, the middle ring and the bottom ring Crimson Glow.  The large ball part as well as the part just over the are going to be Ocean Whisper.

Paint the ball at the top what ever color you want it to be.  Let dry completely.


Remove the tape from the lamp.  It's okay if the paint peels off when you remove the tape.  It will add to the distressed look.  Cover the bulb socket with painter's tape to protect. Lightly spray with the Tuff-Strip.  Remember this lamp is resin not wood. Let is sit for about 5 minutes and start wiping with paper towels.  You can use a scraper if you want to in order to get more of the paint off. Sand away! I used my Dremel with the 535 Brass Brush attachment and the 180 grit Finishing Abrasive Buff (511E).  I LOVE MY DREMEL!


Remove as much or as little paint as you want.  You can sand down all the way to the resin if you like.  It will add to the distress look.  Sand the ball too as to achieve the look you want.

I LOVE IT!


When it looks like you want it, spray to seal.


Enjoy your new lamp.  I know I will!


I recommend using Energy Efficient Daylight Bulbs in your new lamp.

Sunday, May 11, 2014

Simple Charm

Cousin Corporation of America is rolling out a new easy jewelry line for those who want trendy and simplistic at the same time. Simple Charm is a series of interchangeable focal connector charms. Popular icons, both trendy and whimsical, are made into fashionable connectors. Five different bracelet bases are available to choose from.  It is easy to customize your unique accessories with NO TOOLS OR SPECIAL SKILLS REQUIRED.

This line is set to debut in your local Jo-Ann Fabric and Craft Stores on May 15th.

I had the opportunity to play around with some of these.  I have to tell you it's super easy.  I love stacking them.  I was actually able to adjust the size of the bracelet by choosing a smaller or larger connector based on how I wanted the bracelet to hang.  Talk about comfort.  I also mixed and matched my metal colors.  I put a gold charm on the silver bracelet.


These are the ones I received from Cousin. 

The bracelet bases (on right) I received were textured which I really liked.


I love this rhinestone anchor and this faux druzy.

There is even an evil eye charm and a butterfly.

The hooks on the bracelets slip right into the rings on the connectors.  You just give the bracelet a little squeeze to connect and disconnect.  These are great for when you want a quick and stylish bracelet to wear.


So what will these fun and easy charm connectors and bracelets run you?  They are priced from $1.99 to $5.99.  That's a whole lot cheaper than buying ready made jewelry at the department store.


Wednesday, April 16, 2014

Wow....They Were Actually There!

I received a message on Facebook Sunday, April 13th from a fellow member of the Artisan Group telling me she believed she saw a pair of earrings I had gifted through the Artisan Group to the stylist of CW's Hart of Dixie in Saturday's episode "A Good Run of Bad Luck".  Of course I was like, "NO WAY!" I had to go look up the episode online and guess what!  They were actually there!  In the opening sequence of the show was the main character, Zoe Hart, visiting with a fortune teller, Madame Van Horn (played by Deborah Lacey), to discuss the run of bad luck she was having.  On the ears of the fortune teller were none other than my Cancun Sunset earrings.  I was so ecstatic!  I couldn't believe my eyes.  Dangling from this beautiful dark skinned lady were my tropical colored earrings.  She wore them well, and they fit the character.  My earrings did have that gypsy/boho vibe to them.

Screen shot taken from the show.

Here they are: Cancun Sunset Earrings.
If you would like to order a pair, they are available in limited quantities in my Etsy shop.

To order, please visit http://razieladesigns.etsy.com.

Two pair have already sold.


For those who don't know what the Artisan Group is, here is some information taken from their website:
At The Artisan Group® we are on a mission to introduce Hollywood to the best of the handcrafted movement. We do it by providing owners of artisan businesses the chance to introduce their products to celebrities, industry leaders and members of the press through participation in celebrity gift lounges such as those leading up to The Academy Awards*, The Golden Globes* and The Primetime Emmys*. Because The Artisan Group takes a collaborative approach to participation in these lounges, a marketing opportunity that would be prohibitively expensive for most small companies becomes surprisingly affordable.
Members of The Artisan Group showcase an array of handcrafted products, including jewelry; bath and spa products; designer stationery and paper goods; crocheted accessories; children’s apparel; purses and totes; hand-poured candles; hand-bound books and journals; illustrations and paintings; hand-dyed scarves; fine art photography; hair accessories; and pet accessories and toys.
The Artisan Group also offers members guidance in sales, marketing, social media and public relations. For nearly three years, our experienced event representatives have acted as spokespersons and ambassadors for countless artists at Hollywood's top gift lounges, with fantastic results. Because they know and trust us, most celebrities will pose for a professional photo with our artisans’ products.
Participation in The Artisan Group is by invitation only. The result is an exclusive, close-knit community of talented artisans who exhibit excellence of product, great product photography, impressive branding and online shop presence, unique products, an established online sales record and products appropriate (size-wise) for gifting.
I am so excited to be a part of The Artisan Group.  I appreciate all the advice and help they give to artisans about getting their brand out there.  Their team works tirelessly to promote, encourage, and find opportunities to further the handmade community.  To see all the pieces that have been used on the show by all my fellow Artisan Group members, click here.

Wednesday, April 9, 2014

And the Madness Continues.....It's Okay...We Are All Mad Here Anyway.

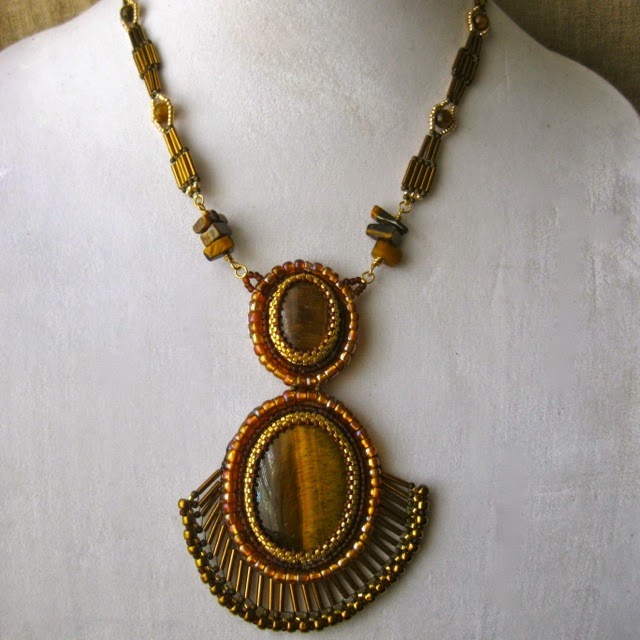
As in a previous post, I have begun bead embroidery.  I have to say, I AM TOTALLY ADDICTED!  After I made my mom's lovely for her birthday (she totally cried by the way when she opened it), I have made two more pieces.

I love the earthiness of Tiger's Eye and decided to use it in my next two pieces.


I did a little different bezel for the stone on these pieces than the first one.  On the first one, I did a back stitch method. On these pieces, I used even count Peyote stitch.  I can't decide which one I like better.  I can see flaws in this photograph.  I didn't have any obvious flaws showing in the back stitch method.

Attaching those spines was an interesting adventure to say the least. :)


I love the design I came up with for the "chain" part of the necklace.  It is a combination of ladder and brick stitches.  I like how these oval Tiger's Eye beads look like candy.

On this next piece, I went simplistic.  I again used the Even Count Peyote stitch for the bezel. Instead of a basic beaded edge, I went with a picot edge which turned out very lovely.  I woven a bail for it as well so I could put it on a chain.


The stitching is much better for this one. 


Still a few wobbles around the edge, but all in all a very lovely piece.


Materials used were:
Toho 11/0 Round in Galvanized Gold and Matte Opaque Soft Brown
Toho 15/0 Round in Matte Opaque Oxblood
Toho 6/0 Round in Bronze
Cousin Bead Basics 11/0 Matte Brown and 6/0 in Amber/Bronze
Toho 9mm Bugle Beads in Antique Bronze
Bead Treasures Tiger's Eye 6mm rounds and 25mm x 17mm oval
Bead Treasures 11/0 Czech Glass in 14 kt Gold Plated Crystal
Tiger's Eye Cabochons: 30mm x 40mm and 25mm x 18mm
Tiger's Eye Bead Chips
Cousin's Elegance Metal 14 kt Gold Plated Jump Rings, Link Chain, and Clasp
Nicole's Bead Backing
Suede Leather
22 gauge Red Brass Wire
Beadalon's Wildfire Braided Beading Thread in both Crystal and Smoke
NYMO thread in Peach
Size 12 English Beading Needle
White Craft Glue