Total Pageviews

Showing posts with label Raziela Designs. Show all posts

Wednesday, August 19, 2015

Raziela Designs to Participate in Luxury Pre-Event Celebrity Gift Lounge in Honor of the 2015 Primetime Emmy Nominees and Presenters

We are pleased to announce Raziela Designs, in association with The Artisan Group®, will participate in an invitation-only luxury pre-event celebrity gift lounge hosted by GBK Productions on September 18-19, 2015 at an exclusive location in Beverly Hills, California in honor of the Emmy nominees and presenters.  

Our Boho Gemstone Dangle Earrings will be gifted to select press and media outlets attending the event. (Pictured below.)


To learn more about Raziela Designs and our products, or our participation in this exclusive event, visit our Etsy Shop, call 601-265-4824 , or email razieladesigns@yahoo.com.

Shelly Owen, Raziela Designs's sole proprietor, is a resident of Pearl, MS.


For press inquiries regarding The Artisan Group, please visit http://www.theartisangroup.org or email press@theartisangroup.org.

*Neither Raziela Designs nor The Artisan Group are officially affiliated with The Academy of Television Arts & Sciences (The Emmys or The Primetime Emmys).

Thursday, December 4, 2014

Rocker Chic DIY Spike Necklace Tutorial - Femme Fatale

It has been some time since I have done a tutorial, so I decided as I was making this necklace to create the tutorial as I went.  It is a very easy necklace to make with just a few items most of which are widely available either online or in craft stores.


Femme Fatale Necklace

Craft Time - Under an hour

Skill Level - Beginner Intermediate

Skills Required
Cutting Chain
Crimping
Jump Rings

Materials:
Beading Wire (I used Cousin brand from Walmart)
6 Gold Spikes (34708503 from Prima Bead)
6 Black Spikes (34708560 Black Spikes from Prima Bead)
13 Silver plated pewter dagger beads from Hobby Lobby (or substitute these from Prima Bead)
Twenty-Four 4mm Black Pearls (7120003 from Prima Bead)
Two Crimp Tube from (3471905 from Prima Bead)
Three 4mm Jump Rings (3471905 from Prima Bead)
Extender Chain (3471905 from Prima Bead)
Two Crimp Covers
Silver Chain (63815134 from Prima Bead)
Art Deco Clasp (34719172 from Prima Bead)

Tools:
Flush Cutters
Flat or Chain Nose
Crimpers

Instructions:
Measure and cut two 8" sections of chain.  The measure a length of about 10 inches of beading wire.  Attach the beading wire to one end of a section of chain using a crimp tube. Cover the crimp with a cover and close with chain nose pliers. Trim off excess.


String on your pattern of spikes and beads alternating between silver gold and black with a 4mm black pearl in between each one.

Finish by attaching the beaded end to the second section of chain using a crimp tube. Cover with a crimp cover and close with chain nose pliers.

Measure and cut a 3" piece of the extender chain from the starter pack and attach it to one end of the chain using a jump ring.  To the end of the extender chain, use a jump ring to attach the last dagger bead. Attach a clasp to the other end of chain using a jump ring.


Your necklace is finished!


Wednesday, April 16, 2014

Wow....They Were Actually There!

I received a message on Facebook Sunday, April 13th from a fellow member of the Artisan Group telling me she believed she saw a pair of earrings I had gifted through the Artisan Group to the stylist of CW's Hart of Dixie in Saturday's episode "A Good Run of Bad Luck".  Of course I was like, "NO WAY!" I had to go look up the episode online and guess what!  They were actually there!  In the opening sequence of the show was the main character, Zoe Hart, visiting with a fortune teller, Madame Van Horn (played by Deborah Lacey), to discuss the run of bad luck she was having.  On the ears of the fortune teller were none other than my Cancun Sunset earrings.  I was so ecstatic!  I couldn't believe my eyes.  Dangling from this beautiful dark skinned lady were my tropical colored earrings.  She wore them well, and they fit the character.  My earrings did have that gypsy/boho vibe to them.

Screen shot taken from the show.

Here they are: Cancun Sunset Earrings.
If you would like to order a pair, they are available in limited quantities in my Etsy shop.

To order, please visit http://razieladesigns.etsy.com.

Two pair have already sold.


For those who don't know what the Artisan Group is, here is some information taken from their website:
At The Artisan Group® we are on a mission to introduce Hollywood to the best of the handcrafted movement. We do it by providing owners of artisan businesses the chance to introduce their products to celebrities, industry leaders and members of the press through participation in celebrity gift lounges such as those leading up to The Academy Awards*, The Golden Globes* and The Primetime Emmys*. Because The Artisan Group takes a collaborative approach to participation in these lounges, a marketing opportunity that would be prohibitively expensive for most small companies becomes surprisingly affordable.
Members of The Artisan Group showcase an array of handcrafted products, including jewelry; bath and spa products; designer stationery and paper goods; crocheted accessories; children’s apparel; purses and totes; hand-poured candles; hand-bound books and journals; illustrations and paintings; hand-dyed scarves; fine art photography; hair accessories; and pet accessories and toys.
The Artisan Group also offers members guidance in sales, marketing, social media and public relations. For nearly three years, our experienced event representatives have acted as spokespersons and ambassadors for countless artists at Hollywood's top gift lounges, with fantastic results. Because they know and trust us, most celebrities will pose for a professional photo with our artisans’ products.
Participation in The Artisan Group is by invitation only. The result is an exclusive, close-knit community of talented artisans who exhibit excellence of product, great product photography, impressive branding and online shop presence, unique products, an established online sales record and products appropriate (size-wise) for gifting.
I am so excited to be a part of The Artisan Group.  I appreciate all the advice and help they give to artisans about getting their brand out there.  Their team works tirelessly to promote, encourage, and find opportunities to further the handmade community.  To see all the pieces that have been used on the show by all my fellow Artisan Group members, click here.

Wednesday, April 9, 2014

And the Madness Continues.....It's Okay...We Are All Mad Here Anyway.

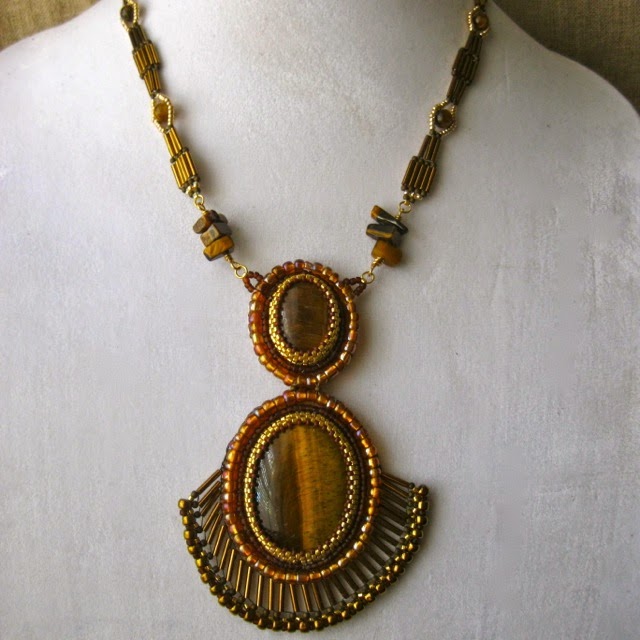
As in a previous post, I have begun bead embroidery.  I have to say, I AM TOTALLY ADDICTED!  After I made my mom's lovely for her birthday (she totally cried by the way when she opened it), I have made two more pieces.

I love the earthiness of Tiger's Eye and decided to use it in my next two pieces.


I did a little different bezel for the stone on these pieces than the first one.  On the first one, I did a back stitch method. On these pieces, I used even count Peyote stitch.  I can't decide which one I like better.  I can see flaws in this photograph.  I didn't have any obvious flaws showing in the back stitch method.

Attaching those spines was an interesting adventure to say the least. :)


I love the design I came up with for the "chain" part of the necklace.  It is a combination of ladder and brick stitches.  I like how these oval Tiger's Eye beads look like candy.

On this next piece, I went simplistic.  I again used the Even Count Peyote stitch for the bezel. Instead of a basic beaded edge, I went with a picot edge which turned out very lovely.  I woven a bail for it as well so I could put it on a chain.


The stitching is much better for this one. 


Still a few wobbles around the edge, but all in all a very lovely piece.


Materials used were:
Toho 11/0 Round in Galvanized Gold and Matte Opaque Soft Brown
Toho 15/0 Round in Matte Opaque Oxblood
Toho 6/0 Round in Bronze
Cousin Bead Basics 11/0 Matte Brown and 6/0 in Amber/Bronze
Toho 9mm Bugle Beads in Antique Bronze
Bead Treasures Tiger's Eye 6mm rounds and 25mm x 17mm oval
Bead Treasures 11/0 Czech Glass in 14 kt Gold Plated Crystal
Tiger's Eye Cabochons: 30mm x 40mm and 25mm x 18mm
Tiger's Eye Bead Chips
Cousin's Elegance Metal 14 kt Gold Plated Jump Rings, Link Chain, and Clasp
Nicole's Bead Backing
Suede Leather
22 gauge Red Brass Wire
Beadalon's Wildfire Braided Beading Thread in both Crystal and Smoke
NYMO thread in Peach
Size 12 English Beading Needle
White Craft Glue

Friday, September 27, 2013

FREE Friday Afternoon DIY Project! Floral Dangle Earrings

Today's project is fun and really sort of simple.  You can use pretty much any color and customize it for Spring, Summer, Fall and Winter by just changing out the colors of the flowers, tear drops and crystals.


Crafting Time: Less than an hour
Skill Level: Beginner to Intermediate
Skills Needed
Cutting Wire
Basic Wire Wrapping
General Knowledge of Hammering
Supplies
22 gauge Red Brass Wire (2 sections of 20 inches) (#NU022 from Jewelry Supply)
2 Crystazzi 6mm Bicone Crystals in K Champagne (#7727320 from Prima Bead)
2 Acrylic 14x21mm Teal Teardops (Item #34709144 from Prima Bead)
2 Lucite Tulip / Lily Of The Valley Flower Bead Caps Matte Orange 6x10mm (BCP-40053 from Beadaholique)
2 Lucite 26mm Plumeria Flower Beads Matte Lemon Yellow (BCP-40009 from Beadaholique)

Tools
Chain Nose pliers
Flush Cutters
Nylon Mallet
Chasing or Ball Peen Hammer
Cup Burr
Steel Bench Block or Anvil
Wire Looping Tool
Optional Tool: Crimping Tool

Measure and straighten 2 pieces of wire 20 inches long.

On one piece of wire, center the crystal. Bend each end of the wire over the crystal forming an X at top the crystal. 

Twist two to three times. Straighten wire. 

Thread both flowers onto both ends of the wire and push down to crystal. 

Take the shortest side of the wire and twist around the longest at the base of the last flower two to three times. 


On the twisting wire, thread the teardrop. At about ½ inch from the base of the flower, twist the wire and bead counterclockwise to form an X above the teardrop and twist three to four more times. Take twisting wire and wrap around the base of the flower twice. 


 Use crimping pliers if necessary to tighten the wraps. Trim excess from twisting wire. 


Bend long wire at a 90 degree angle.  Measure 2 ½ inches from flower base and trim wire. 
Measure 1 inch from base of flower and place the largest part of the barrel of looping pliers. 


 Push wire away from you over the barrel and downward.


At ¼ inch from the end of your wire, make a slight bend with chain nose pliers. 
Repeat for second earring. 


Use a nylon mallet to harden the ear wire on each earring. Using a ball peen hammer or chasing hammer, slightly hammer the ear wire for a forged look. Finish by using a cup burr to smooth the end of the wire.


Crystals can be substituted for Swarovski Crystals if you so choose.  I recommend using Jonquil.


Finished length: 2 ¼ inches.


Friday, July 26, 2013

FREE Friday Afternoon Project - Classic Romance Necklace

Friday, here at last!  What a week!  Glad it's about over.  How about a free project to make it all better?!

An elegant and intricate necklace made from the Jewelry Class In A Box Classic style available from Prima Bead.  This particular project is very intensive and requires more advanced skills.  Project will take about an hour or two.


This particular kit contains glass pearls in various sizes and colors, silver plated findings, jewelry wire, stretch cord, a fluffy bead mat, instruction booklet, and a 3-In-One Tool. This would make some great Christmas jewelry too.

Materials all come from the kit.  No extra pieces required.
2 - 14mm Cream Glass Pearls
2 - 14mm Black Glass Pearls
6 - 10mm Black Glass Pearls
4 - 10mm Cream Glass Pearls
10 - 8mm Cream Glass Pearls
8 - 8mm Black Glass Pearls
8 - Champagne Rondelles
4 - Rhinestone Rondelle Spacers
5 - Head Pins
15 - Eye Pins (If for some reason you are short these, use the trimmed pieces)
1 - Clasp
1 - Jump Ring
1 - Extender Chain
1 - Link Chain

Tools:
Flat Nose
Flush Cutters
Round Nose Pliers

Skills Required:
Form a Loop
Cutting Chain
Jump Rings

Measure and cut a 5.5" piece of chain.  Measure and cut three 4" pieces of chain. Set one of the 4 inch pieces aside.
Create 6 bead connectors by placing one bead onto each eye pin and forming a loop. You will need two 8mm cream pearl, two 8mm black pearl, and two champagne rondelle connectors.

Attach the champagne connectors to each end of the 5.5" chain. Attach a 4" piece of chain to the champagne connector on each side.  Attach a cream pearl connector to each end of the chain. (See photos above.) Attach a black pearl connector to the cream connector on each side. This creates a beaded chain.


Use a jump ring to attach a clasp to one end of the beaded chain (see photo on right).  Attach the extender chain to the other end of the beaded chain.

Measure four links in the chain and pass an eye pin through the link. (See photo on left).  Slide on an 8mm cream pearl, a 10mm black pearl, a champagne rondelle, and a 10mm black pearl. Form a loop.  Repeat for the other side of the necklace.

Create two dangles by placing a 14mm cream pearl onto an eye pin and forming a loop. Attach the dangles to the eye pins hanging from the chain on each side. (See photo on right.)


Measure five links over from the very first eye pin and pass an eye pin through the link.  Slide on a 14mm cream pearl and form a loop. Repeat on opposite side. (See photo on left.)

Create two dangles consisting of a 10mm black pearl, a rhinestone rondelle spacer, an 8mm cream pearl, and a champagne rondelle each. (See photo on right.)

Attach to each 14mm cream pearl. (See photo below.)


Measure seven links over from previous eye pin and insert an eye pin through the link. Slide on a 10mm black pearl, an 8mm cream pearl, a 10mm black pearl, and the last link of the 4" chain that was set aside.  Form a loop. Repeat on opposite side. (See photos below.)


Measure nine links over from the last eye pin and insert an eye pin into the link.  (See photo to left.) Slide on a 10mm cream pearl, a 8mm black pearl, a 10mm cream pearl and pass through the ninth link over from the end of the bottom chain.  Form a loop. Repeat of opposite side.

At the center point of the top chain (should be at the 14th link from the last eye pin) insert an eye pin and thread on a 8mm cream pearl, a champagne rondelle, a rhinestone rondelle spacer, and a 14mm black pearl.  Pass the pin through the center point of the bottom chain (should be the 15th link over from the previous eye pin) and form a loop.

Created on last dangle on a head pin by sliding on a 14mm black pearl, a rhinestone rondelle spacer, a champagne spacer, and a 8mm cream pearl.  Form a loop. Attach to the loop of the eye pin you just finished.

Enjoy your necklace.