Total Pageviews

Monday, February 2, 2015

That's My Jewelry Making Passion

So....what is that one technique that I always revert back to no matter what?  Can you guess?  No?  I think the one technique that I can't live without and am always incorporating into my designs in some way or another is wire wrapping.  Why?  It's a very versatile medium to work in and I find it very relaxing.  And without even knowing it, you probably have done a bit of it.  You might be thinking, "NO, I haven't!" Forming loops on head pins to make earrings sound familiar?  Yup, that was your introduction into wire wrapping.  Wrapped loops to make beaded chains.....again, wire wrapping.  :)  See you have been doing it all along.  TUTORIAL ALERT:  Stay until the end because there is a EASY tutorial!

Some of my fun stuff!
Wire wrapping can be both a challenge and very rewarding at the same time. When you learn some of the vocabulary of wire wrapping, it does make it easier.  I had no clue as to what to buy at all when I started so I just bought stuff.  I didn't understand that there were different tempers and gauges of wire.  I had no idea what I was getting into.  If only someone would have walked me through wire wrapping, I think I would have enjoyed the experimentation a bit more than what I did.  I found it so frustrating at first.  So I am going to share with you a bit about wire that will greatly help you get started into the fun and rewarding realm of wire wrapping.

Wire comes in three tempers - dead soft (best for wrapping in my opinion), half hard (best for making ear wires, and ear cuffs), and hard (great for clasps).  Gauge refers to the thickness of the wire.  Temper and gauge of the wire you choose to work with will effect what you can create.

Earrings made from 20 gauge Red Brass wire.
Gauge can be a bit tricky since the higher the number, the thinner the wire.  If you want to do simple wire wrapping around beads or stones, I recommend a thinner gauge like 26 or 28 in a dead soft temper.  You can also use 26 gauge for wire crochet and knitting. 28 gauge or thinner can be used for beadweaving. If you want to make clasps, use 18 to 16 gauge in half hard or hard.  Once you get used to working with the wire, it will be easier to create what is referred to as "work-hardened" wire. What this means is that
through the manipulation of the wire, you have changed its temper from dead soft to more of a half hard temper and half hard into a more hardened temper.  This can be accomplished through hammering or repetitious movement of the wire. Sometimes, through polishing the wire with a tumbler the wire will harden up some.  Wire also comes in a variety of shapes such as round, half round, square, twisted and patterned.

Bracelet made from 18 gauge Copper wire

When I began jewelry making, the only medium I worked in was beads. It was all I knew.  String some beads, crimp, and go.

I branched out rather quickly into beadweaving and various other techniques using mixed media and fibers. I was intimidated by wire so I stayed away from it.  I had someone encourage me to branch into wire wrapping.  I went and grabbed a bunch of various gauges of steel plated copper wire not knowing there were different temper of wire.  I think I bought all half hard and hard. I wanted to give up, but then I found aluminum wire!  Super soft and oh so easy to work with... also easy to make a mess with due to it's super softness. 
Mixed metal wrapping and clasp

My new BFF quickly became copper. Copper is a very versatile wire....again it comes in various tempers, but even the hard copper wire is easy to manipulate.  I have since branched out into stainless steel wires, red brass (jeweler's brass), German Silver (don't recommend this one since it's almost all Nickel), yellow brass and enameled copper.

I love to mix beads into my wire wrapping and sometimes even a bit of metalwork. You can mix chain, metal shapes, and leather into the wire as well as seen in the photo below to the left.  You can also mix different colors of wire together to get a lovely mixed metal look.


Okay....so what tools would one need for wire wrapping?

PROTECTIVE EYE WEAR is a must have!
Various Gauges, Shapes and Tempers of Wire (readily available at craft stores and online)
Round Nose Pliers
Chain Nose Pliers / flat nose pliers (Chain Nose is also referred to as Needle Nose)
Flush Cutters and/or end nippers
Ruler
Emery board or nail file

As you advance you may want to invest into the following:
Steel Bench Block and rubber base
Rawhide Mallet
Nylon Maller
Various Mandrels (Neck, Bracelet, Ring)
Ball Peen Hammer
Wire Jigs
Bail Making Pliers
Wire Twister (for making some really cool wire out of square wire)
Wire Cup Burr Tool (to remove sharp edges)
Finger Cots (to protect your fingers)
Painters Tape (for holding wire bundles together as you wrap)
Nylon Jaw Pliers (for straightening long pieces of wire)

With wire you can make bezels for pendants, beaded chains, bead frames, ear wires, bracelets, earrings, rings, and even your own chains and jump rings.  Your only limitation if your imagination.  There aren't any rules in wire wrapping, so have some fun!


Okay...so here is your tutorial I promised. I have been making these for a couple of years now and they are fun and easy to make and wear.

Tools & Materials:
Round Nose
Flush Cutters
Ruler
Marker or Bail Making Pliers with a 10 to 12 mm barrel
20 gauge dead soft or half hard wire in your choice of color/metal (do not use Aluminum)

Instructions:
Measure and cut about 5 inches of wire and straighten with your fingers.
Measure from the end of the wire about 2 inches and fold the wire back over the barrel of your round nose pliers.  Measure about two inches from the bend and repeat to create a weird "Z" shape.


Take your round nose pliers and place at the end of the wire and make a loose spiral. Repeat at the other end.


Kind cute!


Press the wire firmly against the barrel of your marker or bail making pliers and wrap the wire around the barrel.

Make a slight bend in the folded ends of the wire using your round nose pliers.


Wear!


Easy-peezy, lemon squeezy!

Thursday, December 4, 2014

Rocker Chic DIY Spike Necklace Tutorial - Femme Fatale

It has been some time since I have done a tutorial, so I decided as I was making this necklace to create the tutorial as I went.  It is a very easy necklace to make with just a few items most of which are widely available either online or in craft stores.


Femme Fatale Necklace

Craft Time - Under an hour

Skill Level - Beginner Intermediate

Skills Required
Cutting Chain
Crimping
Jump Rings

Materials:
Beading Wire (I used Cousin brand from Walmart)
6 Gold Spikes (34708503 from Prima Bead)
6 Black Spikes (34708560 Black Spikes from Prima Bead)
13 Silver plated pewter dagger beads from Hobby Lobby (or substitute these from Prima Bead)
Twenty-Four 4mm Black Pearls (7120003 from Prima Bead)
Two Crimp Tube from (3471905 from Prima Bead)
Three 4mm Jump Rings (3471905 from Prima Bead)
Extender Chain (3471905 from Prima Bead)
Two Crimp Covers
Silver Chain (63815134 from Prima Bead)
Art Deco Clasp (34719172 from Prima Bead)

Tools:
Flush Cutters
Flat or Chain Nose
Crimpers

Instructions:
Measure and cut two 8" sections of chain.  The measure a length of about 10 inches of beading wire.  Attach the beading wire to one end of a section of chain using a crimp tube. Cover the crimp with a cover and close with chain nose pliers. Trim off excess.


String on your pattern of spikes and beads alternating between silver gold and black with a 4mm black pearl in between each one.

Finish by attaching the beaded end to the second section of chain using a crimp tube. Cover with a crimp cover and close with chain nose pliers.

Measure and cut a 3" piece of the extender chain from the starter pack and attach it to one end of the chain using a jump ring.  To the end of the extender chain, use a jump ring to attach the last dagger bead. Attach a clasp to the other end of chain using a jump ring.


Your necklace is finished!


Tuesday, August 12, 2014

All Daintyfied and Super Cute!


Part of the fun of being a Creative Circle Ambassador for Cousin Corporation for America is getting to play around with some of the new product lines before the public gets to see them and design projects to go around those product lines.  Here are two (one easy, one a bit harder) projects using the new daintyfied™ line due to hit Michaels Craft Stores on August 15th.  The daintyfied™ program is comprised of itty, bitty charms and small, thin chains and bangles to serve as the bases.  A mixture of silver and gold charms, chains and bases provide the platform for hundreds of combinations to create and to get your creative juices flowing.


Project One:
daintyfied™ Freespirit Charm Bracelet


Tools:
Two Pair Chain Nose Pliers

Materials:
daintyfied™ #34778252 Bangle
daintyfied™ #34778226 "free" charms (or charms of your choice)

Craft Time:
5 minutes

Skill: Beginner

Jump Rings

Remove the charms and bracelet from packaging.  Attach the charms to the open loop on the bangle with their jump rings.  You can also just slide the charms on to the bangle itself so you can have interchangeable charms as well.


Project Two:
daintyfied™  Charmed Ring


Tools:
Two Pair Chain Nose Pliers
Round Nose Pliers
Ring Mandrel or Large Barreled Marker
Flush Cutters
Ruler
Rawhide Mallet (Optional)

Materials:
daintyfied™ #34778226 "faith" charms (or charms of your choice)
22 gauge Craft Wire (I used Artistic Wire Non-Tarnish Brass)
Head Pins in a finish that matches your wire and charms.
4mm Crystals or Beads (I used Jewelry Basics #34721016)

Craft Time:
25 minutes

Skill: Intermediate Wire Wrapping

Jump Rings
Forming Loops
Wire Wrapping

Remove the charms from packaging and set aside.  Make four bead dangles by threading a 4mm bead onto a head pin and forming a loop.  Set aside.

Measure, cut and straighten 36 inches (91.44 cm).  Place round nose pliers at the center point of the wire and create a loop. 

Determine the size of ring you want to create and place the wire against the ring mandrel or marker barrel at the underside of the loop.  Wrap the wire ends around the mandrel two times each forming a ring shank. 

Take one wire end and bend at a 90º angle.  Wrap around the ring shank five times.  Trim excess wire.  Repeat for the other side of the ring.  Push any rough edge of the wire down using the tip of your chain nose pliers.

Slide the ring back onto the mandrel to ensure that it is still round.  Hammer lightly with a rawhide mallet to harden the shank.

Attach the charms to the loop of the ring. 


Tuesday, August 5, 2014

Bella Amore Legacy Jewelry: Helping My Brother In His Fight Against Brain Cancer

If you have ever faced having cancer or a loved one with cancer, then please pray for this family.  They are a close knit group that would give the shirt off their backs for anyone.  I ask that you pray for them.  If you feel the desire to help them in their fight in other ways, please do so.


Bella Amore Legacy Jewelry: Helping My Brother In His Fight Against Brain Cancer

Wednesday, July 9, 2014

Christmas In July Festive Zipper Pull

The heat is on here in Mississippi, but that won't stop me from thinking about Christmas.  After all, the holiday is only five months away.  I am starting to see Christmas items pop up every where now.  There is a new set of items making their way to Jo-Ann Fabric and Craft Stores and A.C. Moore.  'Tis the Season by Cousin Corporation of America has put out some very lovely new Christmas and Halloween items due out next week or so.

Anyway - TUTORIAL TIME!  This will only take about 20 minutes and is very simple.  If you have a good solid skill set in jewelry making or crafting, you should have no trouble with this tutorial.
We will be making two zipper pulls.  One will be a Christmas tree out of buttons and the other a simple snowflake with dangles.


Supplies:

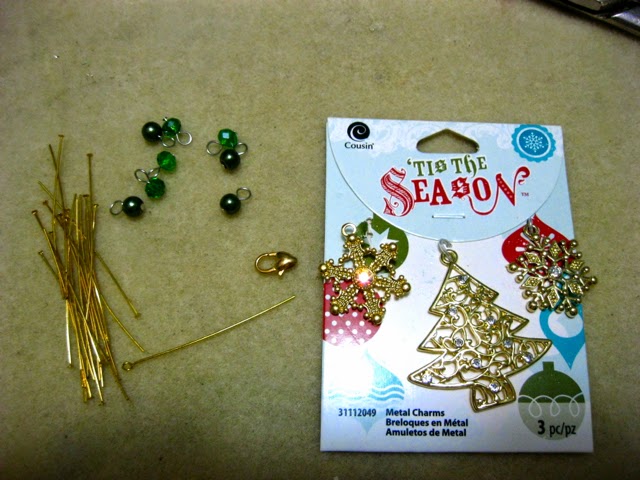
'Tis The Season Glass/Acrylic Accent (#31112055)
'Tis The Season Metal Charms (#31112049)
20 Gauge Craft Wire
2 Large Lobster Claw Clasps - one silver, one gold
Eye Pin
4 Gold Head Pins

Tools:
Flush/Side Cutters
Bail Making Pliers or a Small Marker Barrel
Round Nose Pliers
Flat Nose Pliers

Skills Needed:
Wrapped Loop
Forming Loops
Wire Wrapping

Festive Christmas Zipper Pulls Instructions:
Cut about 7 or 8 inches of craft wire.  Slide the wire through the holes of the buttons from #31112055 in order to form a tree.

Fold the wires at a 90 degree angle to the right.  Take the left wire and bend again at another 90 degree angle.

Wrap the right hand wire around the bend twice.  Trim the wrapping wire. Slide on a few of the crystal dangles from #31112055 in any order you like (save 5 for your next pull).

Slide on the star bead from #31112055. Begin to form a loop using your bail making pliers or marker barrel.  Before you wrap the loop slide on the lobster claw clasp.  Finish your wrapped loop and trim any extra wire.

*NOTE: I like using the swivel lobster claw clasps because they give a bit of action to the zipper pull.


Snowflake Zipper Pull Instructions:

Attach an eye pin to the opening of the snowflake charm from #31112049.  Using the left over five bead dangles from #31112055 and remove them from their head pins.  Make four new dangles with these beads by sliding them onto gold head pins and forming loops at the end. Take the left over bead and slide it onto the eye pin.  Slide on the new dangles.  Begin to form your loop, slide on the lobster claw clasp and then wrap your loop.  Trim off any access.


Tuesday, June 17, 2014

Open, Closed, or Split - Choosing the Best Jump Ring for Your Project

Jump rings are very important jewelry findings.  They provide a means to connecting pieces that wouldn't ordinarily be able to connect. They can vary in sizes, gauges and styles. Your design will dictate which jump ring to use for each project. It can be confusing when trying to pick the right one especially when you are looking at Open, Closed, and Split jump rings. Hopefully, this post will help you choose the right one for your project.

Open Rings 

Open Sesame:  An open jump ring is one that has a cut in it that allows you open and close it as to connect pieces together.  Open jump rings are used in Chainmaille designs and can be grouped in clusters.

To open a jump ring, use two sets of pliers (chain or flat nose).  If you only have one set, you can hold the other side with your fingers or use a jump ring opener.  When opening a jump ring, open with a twist.  It's like a push/pull action.  Push in one direction and pull in the other.  Never open a jump ring by pulling the sides apart.  It will warp the ring.  To close it back, just twist.  You should hear a slight grading of metal on metal when you close the jump ring correctly.
Jump Ring Opener available at Prima Bead


To use the Jump Ring Opener, slide it onto a finger on your non-dominant hand. Insert the jump ring into the closest fitting slot on the jump ring opener.  Using your chain nose pliers or fingers, gently open one side in a downward direction. The tool will help you stabilize the jump rings while you work on them.


See the video below for more technique.


Closed Rings


Closed Up Shop:  Closed jump rings have been soldered shut and have no way of opening them.  These are perfect for adding dimension to dangle earrings.  Use them as a connector for your eye pins and head pins to connect to.  I use them as the an "eye" for clasps.  When I have finished my beading, I slide the wire through the ring and crimp.  It provides a more secure connection for the clasps.  These can come in various styles and shapes and are often referred to as connector links.


 Split Rings

Split Personality: A split ring resembles a miniature key ring.  Split rings provide a stronger connection than open jump rings and offer an opening that closed jump rings cannot.  You can also use these for more secure connections of charms on a charm bracelet.  I find it has more stability and security than regular jump rings when attaching beading wire to a clasp.

There are a few ways to open them.  The first way is to insert a fingernail to open a split ring and slide a head or eye pin shaft to help you hold the spring ring open a you thread on your clasp, bail, or connector.  Once started, pull the pin out of the way, then finish twisting the split ring on.  The second way to open them is using a set of special pliers for split rings or a set of split ring tweezers.

Pliers available from Prima Bead
Tweezers available from Beadaholique
To use a pair of split ring pliers or tweezers, place the split ring on the flat side. As you close the pliers or tweezers, press the pointed side between the rings of the split ring. Once you have a grip on the split ring, you can slide it around until the end is securely open with room to add your charm, clasp, or whatever else you may be attaching.  Slide the object that you are attaching to the split ring onto the open end. Hold the object in your fingers and use flat nose pliers to work the split ring around to the other side, where the object will dangle freely.


Check out the video below. For more information.


My hope is that this information will help you choose the right jump ring for the right project.  Happy beading!


Unless otherwise credited, all photos and videos are from Prima Bead and Cousin Corporation.