Total Pageviews

Showing posts with label Cousin Creative Circle. Show all posts

Friday, March 31, 2017

Design Challenge 2017 -- The Reveal!

Okay...Here it is...the big reveal of our Cousin Creative Circle Ambassador Design Challenge!

On March 6th, I told you guys about our 2017 design challenge we do as Cousin Corporation of America's Creative Circle Ambassadors. (See post here.) All of the ambassadors received the same package of beads, findings, charms, etc to create with. We were able to add in anything from our private stash of beads, charms, connectors, chains, etc to create unique pieces that fit our personality.

Speaking of personalities, here are our Ambassadors:
The Girlie Girl - Rebecca Grafton
The Mermaid - Dawn Doucette
The Die-Hard DIY/Professional Blogger - Jennifer Priest
The Crafty Mom - Rachel Goodman Nielsen
The Laid-Back Author - Lisa Crone
and me - The Wandering Gypsy

Our styles are so different from each other, yet we always seem to be able to create commonality with our pieces.  I'm so excited to share our designs.  You can click the above links to see what my creative sisters have come up with.  Below you can find mine.

Ombré Plum Tassel Druzy Necklace


The items used in this necklace came from the new "Tassel it Yourself" line as well as the standard Jewelry Basics line CCA has.

This faux druzy didn't start out all sparkly.  It was a dull, flat white. Very little shine to it at all.  The druzy is a piece of acrylic resin that has been shaped to look like a druzy.  I fell in love with a strand of ombré plum crystal beads and knew I wanted to do something fun with them.  While I was painting my toe nails, I had this brilliant idea of using the glittery polish on the druzy piece.  The color is "Salsa" and is made by China Glaze.  It was the perfect fit for those lovely crystals.

I also removed the connecting clips from the druzy.
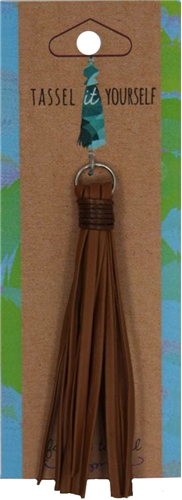


I had this lovely sort of pale copper colored chain that seemed to go well with with coloring around the faux druzy.  I also had a lovely brown leather tassel from the same line as the faux druzy that I wanted to use as well.  The only issue was the jump ring was silver. I needed gold.  Not a big deal. I switched it out for a gold colored one to match the color scheme of the necklace.


I decided to use a short section of chain (four links long) to attach the druzy to the necklace instead of a standard jump ring just to be different.

I arranged the lovely crystals in a pleasing pattern and strung them on 19-strand jewelry wire with the chain sandwiched within the pattern and attached them to the chain.  I didn't use a clasp since I used such a long piece of chain.

I created bead dangles out of some of the left over crystals and attached them to the bottom of the druzy.


The second project was another necklace using blue Calcite stones, brown ceramic beads, beaded link chain, a cross pendant, beaded tassel, polished cotton knotting cord and silver plated beads to create a lovely layered piece.

The Blue Jean Bohem Necklace


The blue Calcite is from the Boho line, the beaded link chain and tassel are from the Tassel it Yourself line, and the cross and ceramic beads are from Jewelry Basics.

I kept the Calcite strand to a choker length so add to the layered look.

The brown beads came strung on hemp so I attached fold over ribbon clamps to each end so I could create the necklace.

I took pieces of the polished cotton knotting cord and folded them in half then strung on the silver plated beads and secured the ends with more old over ribbon clamps. I attached the two together to form the second layer.

I added a jump ring to the cross connector and attached it to the beaded link chain.  Again, I removed the connector clip from the tassel so I could attach it directly to the cross.


The end result is a gorgeously casual necklace that could very easily be worn with a dressy outfit as well.


I hope you have enjoyed these two pieces and hope you look over the other what the my fellow ambassadors have created.  Happy Beading!

Tuesday, July 7, 2015

Florida Keepsake Necklace

Of all the souvenirs I receive and pick up in Florida, I think by far my favorite are the little jars of sand and shells.  Why do I like them?  They have so much project potential.

In this tutorial, I will show you how to make a cute, Swarovski crusted, keepsake necklace like the one below. You can customize the project to use any color you choose.  I chose a seaglass theme.


Supplies I Used:
One "Florida" mini-bottle sand and shell keychain souvenir with keychain removed
One 21x10.5 mm Swarovski crystal pendant (6010) in Golden Shadow (SC5152)
SC5152
SC5152
SC5152
Two 7.2mm Swarovski crystal non-hotfix flatbacks (2028) in Mint Alabasater (hard to find)
One 7.2 mm Swarovski crystal non-hotfix flatbacks (2028) in Sand Opal
Four 6mm Swarovski crystal bicones in Sea Glass (47501514)
Four 4mm Swarovski crystal bicones in Sea Glass (47500514)
Two 6mm  heavy gauge jump ring
One 4mm heavy gauge jump ring
Three regular jump rings
Eight silver plated headpins
Swarovski crystal non-hotfix flatback mix in Turquoise and Brown combo (47509569)
Swarovski crystal non-hotfix flatback mix in Crystal (47509526)
Swarovski crystal 4.7mm 2088 Xilion Rose flatbacks in Light Colorado Topaz
36" beige organza ribbon (63800353)
36" large link silver plated copper chain (AJM-ZG-003-00031 available from Walmart)
12" 18 gauge silver plated copper wire
 E-6000 Glue
Singer brand Sew-No-More (available from Walmart)
Singer brand Fray-No-More (available from Walmart)


Tools Used:
Large Bail Making Pliers
Flush Cutters
Chain Nose Pliers (2 pair)
Round Nose Pliers
Large Yarn Needle
Toothpicks

Techniques Required:
Wire Wrapping
Form a Loop
Jump Rings 
Cutting Chain

Skill Level: Intermediate

Craft Time:  About an hour

Instructions:
Put a heavy gauge jump ring through the hole of the Swarovski pendant. Connect the 4mm heavy gauge jump ring to the first jump ring and set aside.  Create 8 Swarovski crystal bicone dangles using headpins and form a loop. Set aside.


Cut 36 inches of large link chain and set aside. Cut 36 inches of organza ribbon and set aside.

Remove cork from mini-bottle. Using a toothpick smear E-6000 to the inside of the keepsake bottle necklace and replace cork.


Form a Loop at the end of the wire. Press the wire against the neck of the bottle and wrap around the neck about three times.

Take the tail of the wire just past the loop and curl backward and thread the tail back through the loop.


Create a spiral with your fingers. Adjust the wraps with round nose pliers to make sure the spiral is smooth


Wrap around the top of the cork two times and pull around and across the top of the cork.  Using the largest barrel of bail making pliers form a triple wrap and trim the wire flush against the cork.


Using a tooth pick, smear glue into the opening in the wraps of wire at the top of the bottle to secure the wire and allow to dry.


Using a toothpick, smear E-6000 onto the bottom of the bottle and one side of the bottle and begin placing on the flatbacks varying the sizes and colors.


Pick a pattern that is pleasing to you and have fun! Allow to dry.


Open the link of the chain as you would a jump ring - from side to side.

Hook it to the bail of the bottle, and slide into the last link of the other end of the chain.  Close the link.


Open a 6mm jump ring and slide on a 6mm, 4mm bicone, and close the ring. Open another jump ring, thread through the first jump ring and slide one a 6mm and a 4mm bicone.  Repeat until you get to the last jump ring. 


Use a heavy gauge jump ring and thread through the last regular jump ring and slide on the last 6mm bicone dangle, 4mm bicone dangle and the 4mm jump ring of the Swarovski pendant. Attach to the bail of the bottle.

Thread the ribbon onto the large yarn needle. Beginning at the back of the chain, skip the center link and thread through the next skipping every other link.  Make sure to leave a eight inch tail of ribbon.

Do not pull tight or the ribbon could snag on the lengths of the chain.  Pass the needle in the opposite direction of the the tail of the ribbon. 


Smooth out the chain to make sure it isn't bunched up and the ribbon isn't pulled too tight.

Tie a loose overhand knot and then a bow.  Trim the ribbon ends. Treat ends with Fray-No-More and apply a dab of Sew-No-More to the center of the bow.


If you find the "Florida" fading or chipping off, repair with a Sharpie and seal with clear fingernail polish.


Monday, March 30, 2015

What Would Happen: The Reveal

Okay...here we are FINALLY!  If you recall back in February, fellow ambassador Dawn Doucette issued a design challenge to the rest of us Creative Circle gals.  She selected the same group of beads and findings for each of us to create a few pieces or a lot of pieces depending on what we had time to do.


The lovely haul included gemstone beads, acrylic beads, lamp work glass beads, crystals, chain, and a few pendants/charms.  Gorgeous selection if you ask me.  Dawn did an outstanding job of picking the stash.  In addition to using this stash of goodies, we were to add in our own elements from findings to beads and of course our imaginations.


I have teased you with a few of the things I had been working on over the past few weeks. Here is the reveal of what I made using these beautiful items.

The very first piece was came very quickly as far as ideas go.  The implementation of those ideas was a completely different story.  I spend the majority of the time on this bad boy as well as the majority of my stash.  I would get one idea that would morph into another one. The end result is a lovely Bohemian queen look.  It's definitely a statement piece.


Here is a list of the product numbers I used:

1 pc   34780079 - Natural Braided Jute Cord
1 pc   34718105 - Copper Oval Link Chain
1 pc   34737022 - Natural Color Thin Hemp
2 pkg 34708555 - Metal Drop Charms- Copper
1 pkg 34708550 - Metal Flower Connectors 
1 pkg 34708213 - 45pc 6mm Rondelle Copper
6 pkg 34714101 - 9pc Gemstone Teal Marbled
1 pkg 34708494 - 115 pc Coin Charm Copper
1 pkg AJM65011128 - Peace Sign Pendant 
          (Check your local Walmart)
1 pkg AJM64011010 - Tusk Pendant
          (Check your local Walmart)
Clamp Ends/Ribbon Clamps
Copper Lobster Claw Clasp and Extender Chain 
Copper Bail
Copper Jump Rings
Glue


The next piece I created required a bit more skill.  I had somewhat of an idea in my head, but wasn't sure how it would turn out.  I sketched it out and decided to give it a go.  I hand-cut a piece of 26 gauge copper sheet metal, added in some rivets, threaded 18 gauge copper wire through the rivets,  and then added in some of the pretty dark colored gemstones and lovely smoky crystals to the center piece.


Cutting out the center part was a bit tough considering I broke two saw blades on it.  I ended up having to get it started with the saw and finishing it with my sheet metal shears.  The eyelet rivets were easy to set once I punched the holes with my metal punch.  I think this one may be my favorite piece.

Cousin products used:
34714025 - Chocolate Moss Jasper
7728022 - 4mm Crystazzi Satin Button - Light Padparadscha


For my next piece, I wanted to create a simple set.  I wanted something a bit more relaxed and easy going.  I just love these lamp work beads.

Products used:
1 pc   34718105 - Copper Oval Link Chain
1 pkg 3612742  -  Teal Ceramic-Acrylic Mix Strand
Copper findings
5 inches of 20 gauge copper wire


Make sure you check out all the ambassadors' creations by clicking the links below to go to their blogs.

Molly Moore Alexander
Allison Cooling
Lisa Crone
Dawn Doucette
Rachel Goodman Nielsen
Carolina Moore
Rebecca Goodman Utermohlen

Friday, February 27, 2015

What Would Happen: Design Challege Part 2

This is the second part to the blog series we as Creative Circle Ambassadors are doing for our "Design Challenge" issued by fellow ambassador Dawn Doucette.  In my previous post, I introduced you to our teams and showed you all the lovely goodies we received to create our pieces with.  Now it's time to show you a little of my design process and to tease you a bit before the big reveal at the end of March.


I gathered up a few of the supplies that seemed to just go well together and pulled from a few things I already had to accentuate what I was looking at.  I did make some changes to my initial design as some of the supplies didn't behave and want to play well with others.  The leather strap in the center was one of those supplies.  A few things shown in the background were also abandoned as the design took shape.  These supplies are available at your local craft stores and at Prima Bead.  Walmart carries a few of them as well.  I did accidentally inflict a war wound while working on this one.  My pliers slipped and scraped against my knuckle.


Don't you just love these copper paddles.


The next piece was a bit more complicated.  The beads are available on the Prima Bead website as well as your local craft store.  The sheet metal and heavy gauge wire (not shown) are available online from various retailers such as Rio Grande. I broke two saw blades cutting through the copper sheet. LOL.  I guess I wasn't holding my mouth right.  After the first initial cuts, I finished it up the cuts with my shears.

The design is purposely hidden underneath the copper sheet so you can't see what I am planning.
 Hopefully soon, I will let you know the progress of the other ladies. I am excited to see what they are up to.  Ciao for now!


Tuesday, February 17, 2015

What Would Happen?

So what would happen if you gave eight very unique designers the same exact beads to work with?   We are about to find out!  One of our Creative Circle Ambassadors, Dawn Doucette, came up with the idea and hand-picked our supplies for us and a great job she did too.


We have been issued a challenge to create unique items using the same pieces. Okay...sounds fun.  Reveal date will be on March 30th.   We can do whatever we want using the materials given and adding in our own findings, beads, chains, etc. that make us happy. 

I do plan to blog along the way as I brainstorm as to what to create.

Below I have grouped our ladies into "teams.  Most of them have been grouped together by their styles and techniques.  The last grouping is of the last two remaining original Creative Circle Ambassadors.

 THE DESIGNERS

The Glamazons:   It's all about the bling with these two.  The more sparkly, the better for them.  They can move between sharp, edgy, on trend designs to laid back girl next door styling.  They know how to bring the punch to their designs.


Allison Cooling - young, innovative, edgy designer of Quiet Lion Creation, skilled photographer, graphic designer, blogger

After obsessively scanning through Vogue and other fashion magazines, she became inspired by the designer jewelry that filled the pages. Wanting to replicate the look and feel of those designs; she found that after a few experiments, it was easy to do.

Allison aims to show the world that making cool, hip, and beautiful jewelry is fun, regardless of skill level. Her blog is devoted to DIY jewelry using all types of techniques and materials. Occasionally, Allison posts tutorials for men's jewelry, accessory DIYs, nail design DIYs, recipes and art inspirations.


Rebecca Grafton Utermohlen - young, feisty, vibrant, leans more towards the sparkles and glitter, DIY jewelry fanatic, marathon runner, dedicated blogger

Rebecca started making jewelry as a 12-year-old kid who was bored one summer and needed a hobby. As the years have passed, jewelry making became more than just a hobby; it developed into a true passion. Rebecca dabbles in all types of different crafts, but jewelry making remains her favorite.


The Romantics:  These ladies always seem to have that old world charm in their designs.  Romance exudes from all they create. They are laid back, calm people who love the world around them.


Dawn Doucette -Victorian influenced, one of a kind designs, attention to the most intricate details, created works of art that become family heirlooms.

Dawn has been designing jewelry since she was a little girl. What began as loomed friendship bracelets evolved into a business of creating couture jewelry; Bella Amore Legacy Jewelry. Dawn works with gemstones, crystals, pearls and seed beads to create one-of-a-kind statement pieces. Her designs have been published in Beadwork Magazine; winning design contests and modeled by distinguished public speakers.


Molly Moore Alexander - wire and mixed media artist, blogger

Molly is a self-taught jewelry, mixed-media and mosaic artist, and is the owner and designer of Miss Molly’s Designs. Here jewelry designs have been published in such publications as Bead Trends, Belle Armoire Jewelry, Jewellery Magazine and Jewelry Affaire, and can be found in public and private collections around the world.

Each of Molly’s pieces are created lovingly in her home workshop, incorporating copper, silver, glass, resin and natural stones with wire, fiber and found objects, resulting in unique, one-of-a-kind designs. Molly continues to push herself artistically, learning new techniques and working with exciting new materials whenever she can to keep her designs distinctive and current.


The Die-Hard DIY/Crafters:  These ladies bring a very unique perspective to the table.  They have the ability to switch back and forth between crafting and jewelry design with great ease.


Rachel Goodman Nielsen - DIY enthusiast, dedicated blogger

Rachel loves to create. Some of her passions include baking, building stuff, sewing, gardening, crafting and, of course, making jewelry. Rachel loves to try new things and a few years ago decided to give jewelry making a shot. Her sister showed her a few basic skills and she was hooked. She enjoys the process of creating a piece of jewelry and learning new techniques. Rachel shares what she creates with the readers of her blog, Adventures of a DIY Mom, in the form of step-by-step tutorials. Rachel is a wife and stay-at-mom to four kids, three girls and a boy.


Carolina Moore - DIY Fanatic, blogger

Caroline has been crafting all her life in a variety of areas including jewelry, quilting, and papercrafting.  She currently maintains two blogs dedicated to her crafting - alwaysexpectmoore and 30minutecrafts.

She is a newcomer to the Cousin Creative Circle experience.


The Silver Sisters - The last two remaining original Creative Circle Members.  We have been with Cousin from the beginning back in August of 2011.


Lisa Crone - laid back and very organized, author of A Bead in Time, blogger, bead fanatic, creates more classical designs with modern twists, beachy and nature themed designs

Lisa has been designing beaded jewelry for over 20 years. She is a self-professed bead fanatic and enjoys learning new techniques from other bead enthusiasts through books, magazines and classes or improvising as she goes.

In her book A Bead in Time Lisa shares her journey of finding design inspiration in nature, artwork, vacations and the craft store. She currently maintains a daily beading blog where the tagline reads, “appreciating the individual beauty of beads and the unique works of art they are used to create.”

Lisa blogs to share in the fun of the online beading community. She regularly showcases beads, techniques, projects, bead artists, designers and crafters.


Shelly Owen (aka Me) - jewelry designer, wire and metal artist, graphic designer, painter, design style varies, given to melancholy on occasion

Shelly is a self-taught designer with over 20 years experience in jewelry design.  Her designs have been seen on the CW's hit show "Hart of Dixie" and published in Crafts 'n Things magazine.