Total Pageviews

Showing posts with label AC Moore. Show all posts

Thursday, February 4, 2016

Something Sparkly This Way Comes


www.acmoore.com
Cousin Corporation of America has just added Crystazzi® Crystals to their offerings available at A.C. Moore Craft Stores.

Cousin Crystazzi® brings you the finest polished lead crystals in the most popular shapes and colors. Turn the ordinary into extraordinary and add a little sparkle to your life with fabulous Crystazzi® Crystals!  These precision hand cut crystals come in a variety of styles including bicone, saucer, barrel, pear, diamond, cushion, saucer, round, and rondelle.  I can tell you from experience that these crystals they are top quality. When I was teaching jewelry making classes, I would always direct my students to the Crystazzi® Crystals due to their brilliance and durability as well as their price.  Their shine and cut rival that of the higher end crystals without the sticker shock.  The holes through the crystals are always consistent and smooth.  The holes are large enough for 16 gauge wire to pass through with ease making these crystals extremely versatile.

Recently, I received a gorgeous helping of these new beauties from Cousin Corporation of America to play with.


I can't tell you how beautiful these babies are.  You will just have to see them for yourself.  Stop by your local A.C. Moore Craft Stores today and see them for yourself.

Be on the lookout tomorrow for a sparkly good, bridal necklace tutorial using these gorgeous crystals.


Wednesday, April 15, 2015

SPARKLE OVER LOAD with tutorial!


Sparkle overload?  Is there even such a thing?  Sounds made up to me......hehehehehhehe.  If diamonds are a girl's best friend, then Swarovski Crystals would be a diamond's best friend.

I love the fire Swarovski has.  They are well known for their quality and brilliance. 

I love it when I get showered in these amazing crystals and crystal pearls.


I recently received an awesome haul of Swarovski crystals courtesy of Cousin Corporation of America (CCA).  Can I say....LOVE LOVE LOVE!  These fiery babies are part of the new "Create Your Style with Swarovski" line rolling out to A.C. Moore the first week of May by Cousin.  This line will be an addition to the already popular Jewelry Basics line from CCA already available at A.C. Moore.

This is very exciting news for CCA. I have to say that I am so proud of Cousin Corporation of America for being part of the prestigious the "Create Your Style with Swarovski" line.  The unparalleled quality of Swarovski meets the high standard of quality and customer service of Cousin Corporation of America.  It's a win-win combination!

I put together this little tutorial for you to enjoy as you wait for the Create Your Style with Swarovski live to become available at your local A.C. Moore.  This dainty bridal bracelet is both delicate and feminine. You can stack it with other bracelets for a little added bling or alone when you want to be a delicate flower.

Create Your Style with Swarovski Bridal Bracelet  


Skill Level: Beginner

Craft Time: Under an hour

Products Used:
Swarovski Xilion Bicone Pearl Combo in Rosaline (47515518) soon to be available from A.C. Moore
Jewelry Basics 59 pc. Starter Pack in Bright Silver (34719157)
Cord Basics Coated Beading Wire (3202102
Four 4mm Silver Plated Round Beads  (2950243)
Two Crimp Covers
Two Silver Plated Noodle Beads

Tools Used:
Chain Nose
Flush Cutters
Crimp Tool
Tape Measure
Crimp Cover Closing Pliers (Optional)

Skills Needed:
Stringing
Crimping


Begin my measuring your wrist for size.  Mine will comfortably fit a 7 inch bracelet, but I wanted a loose fit so a 7.5 or 7.75 inch would be perfect.

Measure and cut about 5 inches more of wire than your bracelet size.

Attach a 4mm jump ring (the smallest one in the pack) to the clasp and set aside.

Layout your design to make sure it will fit within the size parameters. You can also do a test string to make sure your design will fit within the length parameters.

I ended up not using the original noodle beads I chose because they were a bit overpowering for the design.  I wanted the crystals are to be the focal point of the bracelet, not the metal.

Here are the new noodle beads


String a crimp tube and a 6 mm jump ring (largest one in the pack) onto the beading wire and push the wire back through the crimp tube forming a loop.  Push the tube back up close to the jump ring giving yourself some space between the tube and the jump ring.

Crimp the tube with your crimping pliers.  (I use crimping pliers for this instead of flat or chain nose because the crimping pliers created a small and stronger crimp.)


Photo from Riogrande.com
Slide a crimp cover over the crimped tube and squeeze closed with either crimp cover closing pliers or your chain nose pliers.


Adding the crimp cover gives you a finished, more professional look as well as protecting your crimp.


Thread on your design and double check your length.  Adjust as needed.

If you have trouble getting your beading wire through the noodle bead, make a bend in the wire with your fingers about a half inch from the end of the wire.  This will help the wire not catch on the edge of the noodle bead.


Thread on another crimp tube and pass the wire through the jump ring of the clasp.  Push the wire back through the tube and slide the tube close to the jump ring leaving some room and crimp.  Cover the tube with a crimp cover and close the cover.

Trim off excess wire.


Wear your bracelet in style!


Wednesday, July 9, 2014

Christmas In July Festive Zipper Pull

The heat is on here in Mississippi, but that won't stop me from thinking about Christmas.  After all, the holiday is only five months away.  I am starting to see Christmas items pop up every where now.  There is a new set of items making their way to Jo-Ann Fabric and Craft Stores and A.C. Moore.  'Tis the Season by Cousin Corporation of America has put out some very lovely new Christmas and Halloween items due out next week or so.

Anyway - TUTORIAL TIME!  This will only take about 20 minutes and is very simple.  If you have a good solid skill set in jewelry making or crafting, you should have no trouble with this tutorial.
We will be making two zipper pulls.  One will be a Christmas tree out of buttons and the other a simple snowflake with dangles.


Supplies:

'Tis The Season Glass/Acrylic Accent (#31112055)
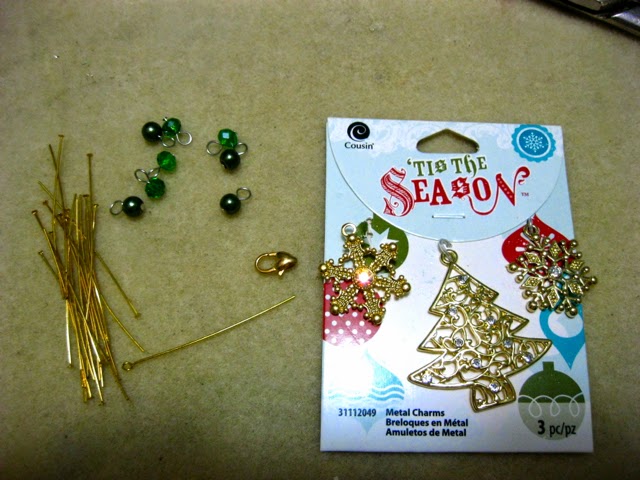
'Tis The Season Metal Charms (#31112049)
20 Gauge Craft Wire
2 Large Lobster Claw Clasps - one silver, one gold
Eye Pin
4 Gold Head Pins

Tools:
Flush/Side Cutters
Bail Making Pliers or a Small Marker Barrel
Round Nose Pliers
Flat Nose Pliers

Skills Needed:
Wrapped Loop
Forming Loops
Wire Wrapping

Festive Christmas Zipper Pulls Instructions:
Cut about 7 or 8 inches of craft wire.  Slide the wire through the holes of the buttons from #31112055 in order to form a tree.

Fold the wires at a 90 degree angle to the right.  Take the left wire and bend again at another 90 degree angle.

Wrap the right hand wire around the bend twice.  Trim the wrapping wire. Slide on a few of the crystal dangles from #31112055 in any order you like (save 5 for your next pull).

Slide on the star bead from #31112055. Begin to form a loop using your bail making pliers or marker barrel.  Before you wrap the loop slide on the lobster claw clasp.  Finish your wrapped loop and trim any extra wire.

*NOTE: I like using the swivel lobster claw clasps because they give a bit of action to the zipper pull.


Snowflake Zipper Pull Instructions:

Attach an eye pin to the opening of the snowflake charm from #31112049.  Using the left over five bead dangles from #31112055 and remove them from their head pins.  Make four new dangles with these beads by sliding them onto gold head pins and forming loops at the end. Take the left over bead and slide it onto the eye pin.  Slide on the new dangles.  Begin to form your loop, slide on the lobster claw clasp and then wrap your loop.  Trim off any access.


Friday, October 25, 2013

FREE Friday Afternoon DIY Project! Jingle Bell Earrings

Sometimes, we just need a quick project to wear for a casual holiday gathering.  These Jingle Bell Earrings are super easy, super fast, and every so cute!  We will once again be using Cousin Corporation's 'Tis The Season line available at Prima Bead and at your local A.C. Moore.


Crafting Time: 10 minutes
Skill Level: Beginner
Skills Needed: Jump Rings

Tools: 2 Pair of Chain Nose Pliers and/or Bent Nose Pliers.  You can also use a jump ring opener.

Materials
(10) 6mm Jump Rings
(2) Ear Wires
(14) Jingle Bells.
I used these for this project 34742124 Tis the Season Bell Jingle Charms - Red/Green/Gold (from Prima Bead).

Begin by opening all of the jump rings.  On one jump ring slide on a jingle bell and close the ring. 
On another ring slip on a jingle bell, the jump ring you just closed and another jingle bell. Close the ring.


Continue until you have used five bells.

Slide on a jingle bell, the previous jump ring, another jingle bell, and the ear wire.  Close the ring.
 
Repeat for second earring.  Quick tip:  Make sure you reverse the colors on the second earring so they will be opposite of each other.


Enjoy your earrings!


Friday, September 20, 2013

FREE Friday Afternoon DIY Project!

Finally, back in the swing of things with doing project posts.  Today I will show you how to make your very own lovely adjustable wire bangle bracelet like this one.


Time:
Less than 30 minutes

Skill Level:
Beginner to Intermediate

Skills Needed:
Cutting wire
Forming Loops

Materials Needed:
14 Gauge wire (I used Red Brass that I ordered from JewelrySupply.com)
Any selection of large hole beads

The beads I used here are 34742152 - 5pc Tis the Season Large Hole Star Mix- Blue/Gold and are available at your local A.C. Moore beginning October 4th, or from Prima Bead. (available now)

Tools:
Chain Nose Pliers
Heavy Duty Wire Cutters or Parrot Beak Memory Wire Cutters
Aerosol can or soda can
Ruler 
Dremel or metal file
Steel Bench Block
Nylon Hammer


Instructions:
Measure, cut and straighten 13 inches of wire. Wrap around aerosol can. It should overlap.

At about 3/4 of an inch from the end, make a right angle bend using chain nose pliers and thread on the beads.


Wrap end around the wire a couple of times.  Tighten with chain nose pliers.
Make sure that it is not too loose that it comes undone or too tight that it won't slide up and down on the wire.


Repeat on the opposite side.


File ends of loops so there isn't any sharp edges that can cut or scratch.


If your wires are a bit wonky and overly bendable.  Straighten them and then give them a good whack with a nylon hammer against your steel bench block.
Wonky wires here.

Whack!  Whack!

Hammering it will work-harden it so that it won't bend up when you wear it.


All finished

Sound off in the comments to let me know what you think!