Total Pageviews

Saturday, November 2, 2013

Beadalon Products Now Available from Cousin

http://www.cousin.com?source=RazielaDesigns

Click Anywhere on the Image Below
for a Complete Listing of All 49 Available Items!


http://www.cousin.com/Beadalon?source=RazielaDesigns

Monday, October 28, 2013

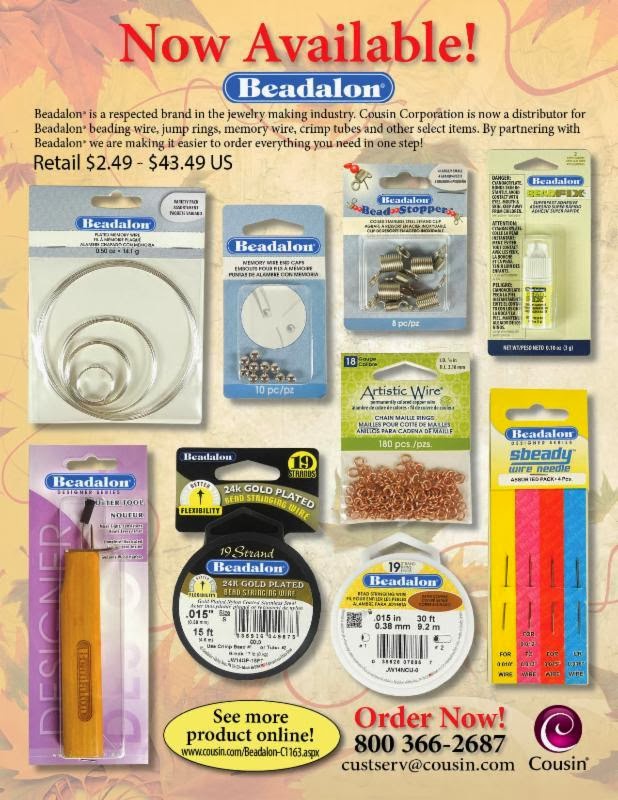
Beadalon Products Now Available from Prima Bead


You may have already come to love the value and selection of quality beads and supplies from Prima Bead, but did you know they now carry Beadalon products?  Recently Prima Bead listed 49 items from Beadalon™.  These items include memory wire, BeadFix jewelry glue, Artistic Wire Chain Maille components, and beading needles.  Prima Bead now even carries the Beadalon™ Pearl Knotting Tool.


Beadalon™ is a well-established brand offering a wide array of beading supplies including: beading wire, cord ends, jump rings, end caps, crimp tubes and other quality components for completing your handmade jewelry. These innovative products make it easy to find a solution to any technical problem that may arise during your design process. Primabead.com is a proud online distributor of Beadalon™ products and accessories. Use these versatile findings for your stringing, knotting or wire wrapping projects and you will find yourself creating gorgeous jewelry in no time at all.
I have personally been using Beadalon™ products off and on for almost all of my jewelry career.  I love their beading wire as well as their Artistic Wire line.  I use the 26 gauge Artistic Wire for my wire crochet.   So, I am very excited that I can now get my Beadalon™ products from a company that has superior customer service and FREE super fast shipping, Prima Bead.

Friday, October 25, 2013

FREE Friday Afternoon DIY Project! Jingle Bell Earrings

Sometimes, we just need a quick project to wear for a casual holiday gathering.  These Jingle Bell Earrings are super easy, super fast, and every so cute!  We will once again be using Cousin Corporation's 'Tis The Season line available at Prima Bead and at your local A.C. Moore.


Crafting Time: 10 minutes
Skill Level: Beginner
Skills Needed: Jump Rings

Tools: 2 Pair of Chain Nose Pliers and/or Bent Nose Pliers.  You can also use a jump ring opener.

Materials
(10) 6mm Jump Rings
(2) Ear Wires
(14) Jingle Bells.
I used these for this project 34742124 Tis the Season Bell Jingle Charms - Red/Green/Gold (from Prima Bead).

Begin by opening all of the jump rings.  On one jump ring slide on a jingle bell and close the ring. 
On another ring slip on a jingle bell, the jump ring you just closed and another jingle bell. Close the ring.


Continue until you have used five bells.

Slide on a jingle bell, the previous jump ring, another jingle bell, and the ear wire.  Close the ring.
 
Repeat for second earring.  Quick tip:  Make sure you reverse the colors on the second earring so they will be opposite of each other.


Enjoy your earrings!


Monday, October 7, 2013

New Line for Cousin Geared Towards Pre-Teen and Teen Girls.

   
iLuv provides ready-made jewelry with an attitude. Whimsical stretch rings add fashion flair. Colorful chain and rhinestone necklace and bracelet sets are paired with charms to show off the current pop culture trends. iLuv has a sense of humor and is great for self-expression, party favors, or gifting. 

 
Program #34744 is available now!

Items in this program have an MSRP of $0.99-$4.99
 
Call now to place your order 
 800.366.2687 
or
 

Friday, September 27, 2013

FREE Friday Afternoon DIY Project! Floral Dangle Earrings

Today's project is fun and really sort of simple.  You can use pretty much any color and customize it for Spring, Summer, Fall and Winter by just changing out the colors of the flowers, tear drops and crystals.


Crafting Time: Less than an hour
Skill Level: Beginner to Intermediate
Skills Needed
Cutting Wire
Basic Wire Wrapping
General Knowledge of Hammering
Supplies
22 gauge Red Brass Wire (2 sections of 20 inches) (#NU022 from Jewelry Supply)
2 Crystazzi 6mm Bicone Crystals in K Champagne (#7727320 from Prima Bead)
2 Acrylic 14x21mm Teal Teardops (Item #34709144 from Prima Bead)
2 Lucite Tulip / Lily Of The Valley Flower Bead Caps Matte Orange 6x10mm (BCP-40053 from Beadaholique)
2 Lucite 26mm Plumeria Flower Beads Matte Lemon Yellow (BCP-40009 from Beadaholique)

Tools
Chain Nose pliers
Flush Cutters
Nylon Mallet
Chasing or Ball Peen Hammer
Cup Burr
Steel Bench Block or Anvil
Wire Looping Tool
Optional Tool: Crimping Tool

Measure and straighten 2 pieces of wire 20 inches long.

On one piece of wire, center the crystal. Bend each end of the wire over the crystal forming an X at top the crystal. 

Twist two to three times. Straighten wire. 

Thread both flowers onto both ends of the wire and push down to crystal. 

Take the shortest side of the wire and twist around the longest at the base of the last flower two to three times. 


On the twisting wire, thread the teardrop. At about ½ inch from the base of the flower, twist the wire and bead counterclockwise to form an X above the teardrop and twist three to four more times. Take twisting wire and wrap around the base of the flower twice. 


 Use crimping pliers if necessary to tighten the wraps. Trim excess from twisting wire. 


Bend long wire at a 90 degree angle.  Measure 2 ½ inches from flower base and trim wire. 
Measure 1 inch from base of flower and place the largest part of the barrel of looping pliers. 


 Push wire away from you over the barrel and downward.


At ¼ inch from the end of your wire, make a slight bend with chain nose pliers. 
Repeat for second earring. 


Use a nylon mallet to harden the ear wire on each earring. Using a ball peen hammer or chasing hammer, slightly hammer the ear wire for a forged look. Finish by using a cup burr to smooth the end of the wire.


Crystals can be substituted for Swarovski Crystals if you so choose.  I recommend using Jonquil.


Finished length: 2 ¼ inches.



Thursday, September 26, 2013

The Real Joy of Painting

Back in 2011, the hubs bought me some paints and canvas for Christmas.  I played around with it and started to remember how much I really enjoyed painting.  Now, mind you it had been almost 20 years since I had painted. My first few paintings showed how rusty I really was, but I kept at it.

One of the very first ones.
I seemed to have gravitated to the abstract first because it really didn't need a subject.  It could go all over the place, and no one would care.

Ad far as realism goes, it was going to be a stretch or so I thought.   I turned my attention to seascapes.  I have to say that I have always been fascinated by the sea and moving water.  Maybe because of all my dad's stories of being at see in the Navy.  But, I didn't know if I could paint them.  I spend about an hour mixing the perfect blue to make sky and then another hour or so trying to mix the perfect blue for the water.  Turns out it's easier to mix it on the canvas than on a palette or jar.

Destin Surf

"Seascape 2"
The painting to the left was painted from a photograph I took while in Destin, Florida.  I think I amazed my own self with how well it turned out.  The painting to the right was my second seascape EVER.  The first one was donated to my church for a Cake Walk sort of thing.

Repaint of "Seascape 1"

"Purple Mountain Majesty"
I just love the relaxation that painting brings. Whether it's water or mountain scenes or silly abstract trees.  I love doing it.  Painting brings in peace and rest for me.  I love the smell of the paint.  I love the fact that I can get totally messy with it if I wanted to.  It doesn't have to be perfect, just fun.  The more I paint the more enjoyable it becomes.

You don't have to explain art to anyone.  You see, art speaks a language all its own.  People are moved by what they see or don't see.  Art reaches people that our words cannot.  Art can tear down walls of resistance and build bridges to the hearts of all who look upon it.  It transcends race, gender, creed, orientation, and even religion.

With that being said, there is an aspect of my art that has been manifesting since I began painting, Prophetic Painting.  I love using art to worship God and to evangelize. Yes my paintings have taken on a religious theme from time to time to reach someone who may be hurting or need to be encouraged.  Prophetic art reaches the unreachable and touches the untouchable.  It breaks down the barriers that the church walls have built around all of us.  The message can be different to each person who sees it.  They feel something, sense something. 

"Coming Home"

"Eyes of the Lord"

"Fountain of God"

"Light of Heaven"

"Pure Heart"


"Redeemed"

"Trump of the Lord"

Friday, September 20, 2013

FREE Friday Afternoon DIY Project!

Finally, back in the swing of things with doing project posts.  Today I will show you how to make your very own lovely adjustable wire bangle bracelet like this one.


Time:
Less than 30 minutes

Skill Level:
Beginner to Intermediate

Skills Needed:
Cutting wire
Forming Loops

Materials Needed:
14 Gauge wire (I used Red Brass that I ordered from JewelrySupply.com)
Any selection of large hole beads

The beads I used here are 34742152 - 5pc Tis the Season Large Hole Star Mix- Blue/Gold and are available at your local A.C. Moore beginning October 4th, or from Prima Bead. (available now)

Tools:
Chain Nose Pliers
Heavy Duty Wire Cutters or Parrot Beak Memory Wire Cutters
Aerosol can or soda can
Ruler 
Dremel or metal file
Steel Bench Block
Nylon Hammer


Instructions:
Measure, cut and straighten 13 inches of wire. Wrap around aerosol can. It should overlap.

At about 3/4 of an inch from the end, make a right angle bend using chain nose pliers and thread on the beads.


Wrap end around the wire a couple of times.  Tighten with chain nose pliers.
Make sure that it is not too loose that it comes undone or too tight that it won't slide up and down on the wire.


Repeat on the opposite side.


File ends of loops so there isn't any sharp edges that can cut or scratch.


If your wires are a bit wonky and overly bendable.  Straighten them and then give them a good whack with a nylon hammer against your steel bench block.
Wonky wires here.

Whack!  Whack!

Hammering it will work-harden it so that it won't bend up when you wear it.


All finished

Sound off in the comments to let me know what you think!