It has been some time since I have done a tutorial, so I decided as I was making this necklace to create the tutorial as I went. It is a very easy necklace to make with just a few items most of which are widely available either online or in craft stores.
String on your pattern of spikes and beads alternating between silver gold and black with a 4mm black pearl in between each one.
Finish by attaching the beaded end to the second section of chain using a crimp tube. Cover with a crimp cover and close with chain nose pliers. Measure and cut a 3" piece of the extender chain from the starter pack and attach it to one end of the chain using a jump ring. To the end of the extender chain, use a jump ring to attach the last dagger bead. Attach a clasp to the other end of chain using a jump ring.
Part of the fun of being a Creative Circle Ambassador for Cousin Corporation for America is getting to play around with some of the new product lines before the public gets to see them and design projects to go around those product lines. Here are two (one easy, one a bit harder) projects using the new daintyfied™ line due to hit Michaels Craft Stores on August 15th. The daintyfied™program is comprised of itty, bitty charms and small, thin chains and bangles to serve as the bases. A mixture of silver and gold charms, chains and bases provide the platform for hundreds of combinations to create and to get your creative juices flowing.
Materials: daintyfied™ #34778252 Bangle daintyfied™ #34778226 "free" charms (or charms of your choice) Craft Time: 5 minutes Skill: Beginner
Jump Rings Remove the charms and bracelet from packaging. Attach the charms to the open loop on the bangle with their jump rings. You can also just slide the charms on to the bangle itself so you can have interchangeable charms as well.
Project Two: daintyfied™ Charmed Ring
Tools:
Two Pair Chain Nose Pliers
Round Nose Pliers
Ring Mandrel or Large Barreled Marker
Flush Cutters
Ruler
Rawhide Mallet (Optional)
Materials: daintyfied™ #34778226 "faith" charms (or charms of your choice) 22 gauge Craft Wire (I used Artistic Wire Non-Tarnish Brass) Head Pins in a finish that matches your wire and charms. 4mm Crystals or Beads (I used Jewelry Basics #34721016) Craft Time: 25 minutes Skill: Intermediate Wire Wrapping
Jump Rings Forming Loops Wire Wrapping Remove the charms from packaging and set aside. Make four bead dangles by threading a 4mm bead onto a head pin and forming a loop. Set aside.
Measure, cut and straighten 36 inches (91.44 cm). Place round nose pliers at the center point of the wire and create a loop.
Determine the size of ring you want to create and place the wire against the ring mandrel or marker barrel at the underside of the loop. Wrap the wire ends around the mandrel two times each forming a ring shank.
Take one wire end and bend at a 90º angle. Wrap around the ring shank five times. Trim excess wire. Repeat for the other side of the ring. Push any rough edge of the wire down using the tip of your chain nose pliers.
Slide the ring back onto the mandrel to ensure that it is still round. Hammer lightly with a rawhide mallet to harden the shank.
If you have ever faced having cancer or a loved one with cancer, then please pray for this family. They are a close knit group that would give the shirt off their backs for anyone. I ask that you pray for them. If you feel the desire to help them in their fight in other ways, please do so.
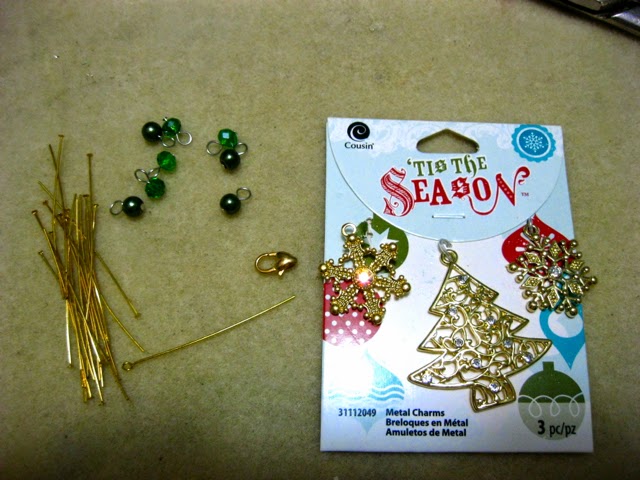
The heat is on here in Mississippi, but that won't stop me from thinking about Christmas. After all, the holiday is only five months away. I am starting to see Christmas items pop up every where now. There is a new set of items making their way to Jo-Ann Fabric and Craft Stores and A.C. Moore.'Tis the Season by Cousin Corporation of America has put out some very lovely new Christmas and Halloween items due out next week or so.
Anyway - TUTORIAL TIME! This will only take about 20 minutes and is very simple. If you have a good solid skill set in jewelry making or crafting, you should have no trouble with this tutorial.
We will be making two zipper pulls. One will be a Christmas tree out of buttons and the other a simple snowflake with dangles.
Supplies:
'Tis The Season Glass/Acrylic Accent (#31112055)
'Tis The Season Metal Charms (#31112049)
20 Gauge Craft Wire
2 Large Lobster Claw Clasps - one silver, one gold
Eye Pin
4 Gold Head Pins
Tools:
Flush/Side Cutters
Bail Making Pliers or a Small Marker Barrel
Round Nose Pliers
Flat Nose Pliers
Cut about 7 or 8 inches of craft wire. Slide the wire through the holes of the buttons from #31112055 in order to form a tree.
Fold the wires at a 90 degree angle to the right. Take the left wire and bend again at another 90 degree angle.
Wrap the right hand wire around the bend twice. Trim the wrapping wire. Slide on a few of the crystal dangles from #31112055 in any order you like (save 5 for your next pull).
Slide on the star bead from #31112055. Begin to form a loop using your bail making pliers or marker barrel. Before you wrap the loop slide on the lobster claw clasp. Finish your wrapped loop and trim any extra wire.
*NOTE: I like using the swivel lobster claw clasps because they give a bit of action to the zipper pull.
Snowflake Zipper Pull Instructions:
Attach an eye pin to the opening of the snowflake charm from #31112049. Using the left over five bead dangles from #31112055 and remove them from their head pins. Make four new dangles with these beads by sliding them onto gold head pins and forming loops at the end. Take the left over bead and slide it onto the eye pin. Slide on the new dangles. Begin to form your loop, slide on the lobster claw clasp and then wrap your loop. Trim off any access.
Jump rings are very important jewelry findings. They provide a means to connecting pieces that wouldn't ordinarily be able to connect. They can vary in sizes, gauges and styles. Your design will dictate which jump ring to use for each project. It can be confusing when trying to pick the right one especially when you are looking at Open, Closed, and Split jump rings. Hopefully, this post will help you choose the right one for your project.
Open Rings
Open Sesame: An open jump ring is one that has a cut in it that allows you open and close it as to connect pieces together. Open jump rings are used in Chainmaille designs and can be grouped in clusters.
To open a jump ring, use two sets of pliers (chain or flat nose). If you only have one set, you can hold the other side with your fingers or use a jump ring opener. When opening a jump ring, open with a twist. It's like a push/pull action. Push in one direction and pull in the other. Never open a jump ring by pulling the sides apart. It will warp the ring. To close it back, just twist. You should hear a slight grading of metal on metal when you close the jump ring correctly.
To use the Jump Ring Opener, slide it onto a finger on your non-dominant hand. Insert the jump ring into the closest fitting slot on the jump ring opener. Using
your chain nose pliers or fingers, gently open one side in a downward direction.
The tool will help you stabilize the jump rings while you work on them.
See the video below for more technique.
Closed Rings
Closed Up Shop: Closed jump rings have been soldered shut and have no way of opening them. These are perfect for adding dimension to dangle earrings. Use them as a connector for your eye pins and head pins to connect to. I use them as the an "eye" for clasps. When I have finished my beading, I slide the wire through the ring and crimp. It provides a more secure connection for the clasps. These can come in various styles and shapes and are often referred to as connector links.
Split Rings
Split Personality:
A split ring resembles a miniature key ring. Split rings provide a
stronger connection than open jump rings and offer an opening that
closed jump rings cannot. You can also use these for more secure
connections of charms on a charm bracelet. I find it has more stability and security than regular jump rings when attaching beading wire to a clasp.
There are a few ways to open them. The first way is to insert a fingernail to open a split ring and slide a head or eye pin
shaft to help you hold the spring ring open a you thread on your clasp, bail, or connector.
Once started, pull the pin out of the way, then finish twisting the split ring
on. The second way to open them is using a set of special pliers for split rings or a set of split ring tweezers.
To use a pair of split ring pliers or tweezers, place the split ring on the flat side. As you close the
pliers or tweezers, press the pointed side between the rings of the split ring.
Once you have a grip on the split ring, you can slide it around until
the end is securely open with room to add your charm, clasp, or whatever
else you may be attaching. Slide
the object that you are attaching to the split ring onto the open end.
Hold the object in your fingers and use flat nose pliers to work the
split ring around to the other side, where the object will dangle
freely.
Check out the video below. For more information.
My hope is that this information will help you choose the right jump ring for the right project. Happy beading!
Love the look of ribbon jewelry? Then you will love this tutorial.
It's easy and simple. There are no major skills required at all. All
you need is a bit of imagination to create these lovely earrings.
Skill Level:
Beginner
Skills Needed:
Opening Jump Rings
Materials:
Two 8mm Split Rings
Ear Wires
2 Large Holed Beads
Ribbon
Fray No More or product similar
Measure
and cut two pieces of ribbon around 8 inches long. Open the loop at
the bottom of the ear wires and slide on a split ring. Close the loop.
The reason I used split rings instead of regular jump rings is the split
rings are more stable and can hold up under rough handling. Go ahead
and repeat for the other ear wire.
Slide
the ribbon into the split ring. Slip on the collapsible eye needle
onto both ends of the ribbon. Slide the needle into the opening of the
bead and out the other side. Pull completely through and slide the
needle off.
Slide
the bead up the ribbon and tie an overhand knot just up from the end of
the ribbon. Coat the ends of the ribbon with the Fray No More.
Repeat for the other earrings. Wear them in style.


 Flush Cutters
 Measure and cut two 8" sections of chain. The measure a length of about 10 inches of beading wire. Attach the beading wire to one end of a section of chain using a crimp tube. Cover the crimp with a cover and close with chain nose pliers. Trim off excess.


